How to Create & File 1099 QuickBooks Forms? [Updated 2026]
- racheeldavis1990
- Dec 11, 2025
- 6 min read
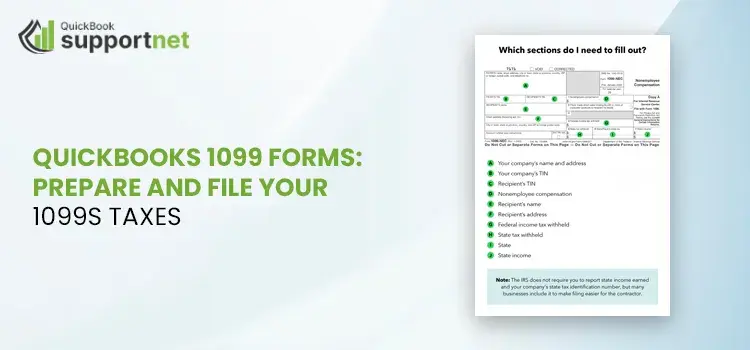
QuickBooks 1099 forms are used to report many kinds of income, that consists of miscellaneous income, interest, dividends, and much more. It gives information in detail about the recipient, payment amounts, tax withholding, and more.
Furthermore, read this blog and learn how to create & File 1099s in QuickBooks.
"If you want to know more or you need an expert's guidance to navigate you through the process of How to Create & File 1099s in QuickBooks, call the QuickBooks experts or give us a call at +1-866-500-0076".
What is QuickBooks 1099 forms?
1099 forms for QuickBooks is not a single form, but a set of many forms altogether, that is filed by a particular organization or a business, in simple words by the person who runs the business. There are a varied types of 1099 forms, and each of them serve a different purpose. It is important for every scale business to issue these 1099 forms. Copies of these forms are sent to those who are paid and to the IRS. The form lists the payments made during the tax year.
Sometimes the forms are even sent to the state taxing authority. The IRS requires payers to provide most 1099 forms till January 31; in some cases, the deadline extends to February 15. In simple words, the forms 1099 in QuickBooks are meant o be filed by the owners of the businesses, who are not a part of their respective organization.
How to do QuickBooks 1099 Filing & Creation
Here, we will get a glimpse of how a QuickBooks user can file and create 1099 form – QuickBooks. Let us see the steps of creating and filing one by one in a detailed way. Let us look at the steps on how to create and file the form.
Before you move on to the process of how to create & File 1099s in QuickBooks, it is compulsory for the QuickBooks user to update the QuickBooks application. The steps to update QuickBooks are given below, and basically, this is the first and foremost step to start with when you want to file a 1099 form in the QuickBooks application. Let us see the steps.
Steps to Update QuickBooks
Updating the QuickBooks application can help you eliminate the error. The steps to update the QuickBooks application are as follows-
Step 1: Verify if you are using the latest release.
Firstly, open QuickBooks Desktop.
Now, you have to press the F1 OR CTRL +1 key, and the product information window will open.
Now, check the version and the release.
Step 2 – Update the QuickBooks Application
In this segment, we will look at the steps to update the QuickBooks application. The steps to do so are as follows-
Close the QuickBooks application along with all the company files.
Now, navigate to the Start menu.
Look for QuickBooks Desktop, right-click on the menu, and run it as an administrator.
Now, navigate to the Help Menu and select the option Update QuickBooks.
Now, navigate to the Options tab, go to Select, and then click on the Save option.
Now, navigate to the Update Now tab and select the Reset Update checkbox.
When you're ready, select the option Get Updates.
When the update finishes, relaunch QuickBooks Desktop. To install the updates, select Install Now.
Step 3 – Get updates from the internet
You can also download the specific updates directly from the official website.
Go to the Downloads & Updates (available on the English page).
Now, go to the Select Country drop-down and select your country.
Now, from the Select Product drop-down, select your product.
Creating 1099 Forms in QuickBooks Desktop
In this part of the blog, we will see the steps of creating 1099 Forms in QuickBooks Desktop. Let us have a look at the steps.
Follow these steps that are given below to create your 1099s in QuickBooks Desktop. The steps will surely help you to create and file a 1099 in QuickBooks Desktop if followed precisely and with caution accordingly.
In the first and foremost step, open the QuickBooks application, then navigate to the Vendors option, then choose the option QuickBooks 1099 Forms, then Print/E-file 1099 Forms.
Now, you must be creating the form and initiating a backup.
Select the option " Get started for the 1099 form you are willing to create. If you wish to create 1099-NEC and QuickBooks 1099 MISC forms, you'll need to repeat the same procedure for filing the other form, too.
Important: There are some changes in the 1099 forms and boxes; be careful while you are choosing your forms. Most businesses will consider choosing "Non-employee compensation, Box 1 on the 1099-NEC, but have a word about the information with your accountant if you are doubtful, if you think you have made other types of payments.
4. States such New Jersey or Wisconsin, these states have special rules for the Form 1099 in and if you are filing forms for these states check boxes 16 and 17. See the option File your state 1099 forms.
5. Look for the vendors for whom you need to file a 1099 form and select Continue.
6. Make sure that the vendor information is correct. You should edit any incorrect information
if entered incorrectly. Double-click on the section that requires an Update. Select the option Continue.
7. In this step, hover to the section of vendor payment accounts. Here, go to the drop-down menu in the Apply payments to this 1099 box section. Select the account you are willing to connect the payment to. If you come through any boxes that are gray in colour, they will be mapped down to the other 1099 form. You are eligible to do mapping of accounts to only one 1099 form. When this process is completed, select the option Continue.
Note: If you come through a message in red colour that highlight that your settings do not match the current IRS qualifications, select the Show IRS 1099-MISC filing thresholds option and choose the option Reset to IRS Thresholds.
8. Be certain of reviewing your payment information for any kind of exclusions, to avoid any errors. For more information on what can be excluded and needs to be excluded, see What payments are excluded from a 1099-NEC and 1099-MISC? Select the option View Included Payments or View Excluded Payments to see detailed reports.
9. Now, select the option Continue.
10. In the second last step, re-check the vendors and amounts you're going to report.
11. Select Continue again.
12. Choose whether to print 1099s or e-file.
Note: If you want to look for the vendors who don't meet the IRS qualifications, select the option View Summary Report.
Final Thoughts
We are at the end of the blog. We have thoroughly covered how a QuickBooks user can be creating, filing and printing 1099 in QuickBooks. In case you face some difficulty in understanding how to file 1099s in QuickBooks, you should make a call to us on our toll-free number to help you throughout the day, 24/7.
Frequently Asked Questions
Q- Can I use QuickBooks for 1099?
Ans – QuickBooks subscribers can e-file 1099s by selecting the Contractor tab in QuickBooks and selecting Prepare 1099s. E-filing is included with QuickBooks Contractor Payments and QuickBooks Online Payroll Core, Premium, and Elite (additional fee).
Q- What is the threshold for a 1099 in QuickBooks?
Ans – A 1099 form is generally issued when a contractor's payments reach or surpass the $600 threshold within a calendar year. If payments to a vendor set up as a contractor do not meet this threshold, there's no requirement to file a 1099, and QuickBooks Online typically will not generate a 1099 form for that contractor.
Q – How much does 1099 filing cost?
Ans -
Quantity | E-File, Print & Mail | Print & Mail Only |
Forms/Order | Price/Form | Price/Form |
1 – 25 | $5.25 | $2.20 |
26 – 75 | $4.95 | $2.10 |
76 – 150 | $4.60 | $2.00 |
Q – What happens if I don't file my 1099-NEC on my taxes?
Ans – The penalties for missing the filing deadline for 1099 NEC and 1099 MISC forms can vary. The IRS may impose penalties based on the number of forms not filed and the duration past the deadline. The penalties range from $50 – $280 per form (tax year 2022), depending on lateness.
Q – Does QuickBooks automatically send 1099 to IRS?
Ans – If you choose to e-file through QuickBooks, the software will automatically submit the form on your behalf. If filing by mail, make sure to send the documents well before the January 31 deadline to avoid penalties. In addition to filing with the IRS, be sure to send Copy B to each contractor by the same deadline.
Read More: We Weren’t Able to Show Payroll Info

Comments